0 Cara Membuat Tex Box Dengan Hover Effect Css3

Selamat siang sobat blogger setelah senelumnya kita membahas tentang Membuat Widget TOP Comentator kali ini Kolom Tutorial™ akan mencoba sebuah tutorial sederhana dengan teknik CSS Hover effect, Tutorial kita kali ini adalah tentang pembuatan Tex Box Dengan Hover Effect Css3, freviewnya kurang lebih seperti pada gambar dibawah ini :


elamat siang sobat blogger setelah senelumnya kita membahas tentang Membuat Widget TOP Comentator kali ini Kolom Tutorial™ akan mencoba sebuah tutorial sederhana dengan teknik CSS Hover effect, Tutorial kita kali ini adalah tentang pembuatan Tex Box Dengan Hover Effect Css3, freviewnya kurang lebih seperti pada gambar dibawah ini :


Dan sobat mari kita lanjut ke tutornya : 
1. Seperti biasa Login ke Akun Blogger sobat
2. Klik Template Klik Edit HTML
3. Jangan Lupa Centang Expand Widget Template
4. Cari kode ]]></b:skin> dan letakan kode CSS dibawah tepat diatas kode


CSS
 .KTboxmessage
{
color: white;
background-color: black;
width: 500px;
margin: 5px 60px;
padding: 20px 20px 20px 20px;
border: 2px dotted lightgrey;
border-radius: 10px;
box-shadow: -1px -1px 12px 2px gainsboro;
transition: background-color .777s;
-webkit-transition: background-color .777s;
-moz-transition: background-color .777s;
-o-transition: background-color .777s;
-ms-transition: background-color .777s;
}

.KTboxmessage:hover
{
background-color: CornflowerBlue ;

}
.KTboxmessage:active
{
background-color: darkgreen ;
} 
 
 
5. Klik Save

Keterangan :

Untuk Penulisan dalam postingan atau widget gunakan kode :


Html 
<div class="KTboxmessage" style="font-family: &quot;Courier New&quot;
,Courier,monospace;">LetakanTulisan Atau Kode Disini</div>  


Ok soba, selamat berkreasi sekian artikel tentangmembuat Tex Box Dengan Hover Effect Css3, happy blogging and enjoy.


Read More


0 Modul/Widget Tracking Pengiriman JNE, TIKI & POS


Bagi anda pelaku usaha yang memiliki website atau blog sebagai toko virtual di dunia maya, aktivitas pengiriman barang melalui jasa kurir pasti merupakan hal yang biasa dan lumrah. Tak jarang juga pelanggan yang menanyakan nomor resi pengiriman untuk mengetahui progress dari barang yang dipesannya. Berdasarkan pengalaman pribadi, ada tiga jasa kurir/pengiriman barang yang paling sering digunakan para pelanggan, yakni JNE, TIKI, dan POS Indonesia. Pelanggan yang ingin mengecek nomor resinya pun harus membuka website dari penyedia jasa pengiriman tersebut. Namun akan terkesan lebih elegan dan profesional jika di website/blog toko online anda menyediakan fitur untuk mengecek nomor resi ketiga jasa pengiriman tsb, yakni JNE, TIKI atau POS. Dampaknya pun sangat baik bagi toko online anda, yakni lebih sering dikunjungi pelanggan sehingga meningkatkan jumlah visitor website/blog tentunya.

Dengan menggunakan teknik form method get atau post yang disesuaikan dengan website dari masing-masing jasa pengiriman, anda dapat memasang widget form pengecekan nomor resi yang terhubung langsung dengan database jasa pengiriman tsb.

Berikut akan saya share kode html widget tracking pengiriman / pengecekan nomor resi yang dapat dipasang di website atau di blogspot dengan menambahkan widget HTML terlebih dahulu.

Kode Widget HTML Cek Nomor Resi / Tracking Pengiriman TIKI:

No Resi TIKI
<form method="post" action="http://www.tiki-online.com/tracking/track_single" name="input" target="_blank">
No Resi TIKI <br/>
<input id="TxtCon" name="TxtCon" type="text" />
<input id="button" name="button" type="submit" value="Track" /></form>


Kode Widget HTML Cek Nomor Resi / Tracking Pengiriman JNE:

Nomor Resi JNE
<form method="post" action="http://www.jne.co.id/index.php?mib=tracking&lang=IN" target="_blank">
Nomor Resi JNE <br />
<input name="awbnum" type="text" class="rightsearch" id="awbnum" size="26" />
<input type="submit" name="submittracking" class="btlogin" value="Track" id="trksubmit" />
</form>
 
Kode Widget HTML Cek Nomor Resi / Tracking Pengiriman POS INDONESIA:

No Resi POS

<form method="get" action="http://www.posindonesia.co.id/home/modules/mod_search/tmpl/libs/lacakk1121m4np05.php" name="input" target="_blank">
<input type="hidden" name="lacak" value="Lacak" />
No Resi POS <br/>
<input name="barcode" type="text" />
<input type="submit" value="Submit" /></form>


Selamat Mencoba di Toko Online masing-masing!
Read More


0 ProPress


ProPress

We are proud to release the ProPress Blogger Template as a free download. ProPress features a popping navigation menu in the header as well a 3 column footer.


Blog Platform: Blogger
Designed by: TheBlogTemplates
Features: 2 Columns, Blue, Fixed Width, Right Sidebar


The Read More Feature

To use the “Read More” Function for this template just put everything you want to “hide” between the following lines:
<span class="fullpost"> </span>
Example:
This is the part that will show up on the main page <span class="fullpost"> and this part will be hidden. </span>

Links in the Footer

If you choose to place links in the footer section make sure to put a list tag around each link.

<li>Link Code</li>

Example:

<li><a href="http://bSaves.com" mce_href="http://bSaves.com">Black Google</a></li>

The Subscribe and Follow Widget

Go to Layout and then click “Add a Gadget” in the sidebar. Add an “HTML/JavaScript” gadget and paste in the following code:

<div id="stats"> <p><a class="rss" href="http://feeds.feedburner.com/widgetsforfree" mce_href="http://feeds.feedburner.com/widgetsforfree" title="Subscribe via RSS">RSS</a><br /> <a class="twitter" href="http://twitter.com/bsaves" mce_href="http://twitter.com/bsaves" title="Follow Us on Twitter">Twitter</a><br /> <a class="youtube" href="http://www.youtube.com/howhero" mce_href="http://www.youtube.com/howhero" title="Join Our Youtube Community">uTube</a><br /> <a class="email" href="http://feedburner.google.com/fb/a/mailverify?uri=widgetsforfree&loc=en_US" mce_href="http://feedburner.google.com/fb/a/mailverify?uri=widgetsforfree&loc=en_US" title="Subscribe to Email Updates">Email</a></p> </div>

If you need any further help customizing the template, leave a comment below and we’ll be glad to help!
Read More


0 Field of Dreams" Blogger Template

Here is another wonderful Blogger Template for you guys "Field of Dreams". As you can see, the template is very good,professional looking two column blogger template. Originally it was a wordpress theme designed by notsoboringlife.com. I converted it to Blogger Format.Hope you like it :)

After downloading the template, Unzip it and upload the xml file using the upload template option in Template » Edit html
»After uploading the template, you can convert the links and text at the top navbar (see the screenshot below)


Scroll down the template until you see this code:


Change the Anchor text (ex: Home,Pictures,Videos,Contact) and enter the corresponding url in between the a href tags
example:


Hope you like my work! More template are coming very very soon..(atleast a template each day). Please don't forget back and check for updates.


--------------------
Reply to Bernadette Anee's comment:

Go through the template code and find this


and replace the above code with this one


and Save the template.

-------------------------------
Adding Time stamp to your blog:-
NOTE: This is for those who downloaded the template before August 22,2008
-------------------------------
Go to Template » Edit html
and find this code (Control+F to search)

<span class='post-author'>
<b:if cond='data:top.showAuthor'>
<data:top.authorLabel/> <data:post.author/>
</b:if>
</span>

and add this code just below the above code and Save the template.

<b:if cond='data:post.dateHeader'> on
<data:post.dateHeader/>
</b:if>


Read More


0 Wonderful Blogger Template "Connexion"


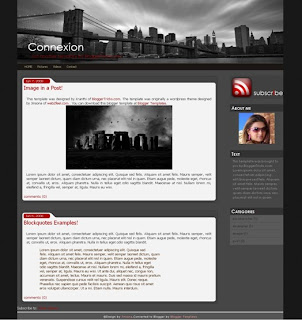
Connexion Blogger Template Screenshot

Download Wonderful Blogger Template 'Connexion'-
Ok... as I promised before to design more and more Blogger templates for you guys.. here is my latest entry 'Connexion'.This was originally a wordpress theme designed by Jinsona of web2feel.com for wordpress.org users.I converted it to our friendly blogger :)


Please read the below instructions carefully: After uploading the template using the upload button in "Template »» Edit html", you have to do a couple of things.

1.Change the top navigation links to your desired ones..


this is how to do:-
Scroll down the template untill you find this piece of code...

<div id="'mainmenu'">  <ul><li>
<a href="'#'">HOME</a></li><li>
<a href="'#'">Pictures</a></li><li>
<a href="'#'">Videos</a></li><li>
<a href="'#'">Contact</a></li>
<br /><br /> </ul> </div> 

 and Replace the anchor text (Home,pictures,etc) and add the corresponding link replacing the # symbol

2. Change the RSS Feed link.
 
Find this code below  

<div id="'rssbox'"><a href="'feeds.feedburner.com/yourfeed'"><img alt="'Subscribe'" src="'http://bloggertricks.com.googlepages.com/connexion-rss.gif'" style="'vertical-align:middle'/" /></a></div>


and Replace the feedburner link (http........./yourfeed) to your's and SAVE THE CHANGES.
Hope you like it! More template are on the way... don't forget to come back and check for updates!


Read More


0 3 Column Blogger Template 'Pepper'


Here it is guys.. the todays template "Peppers 3 column Blogger Template".
Few people are asking me to design 3 column blogger templates over the past week and so.. So, here it is.. The template comes with well designed,fully packaged, 3 column dark Blogger layout.This wonderful design was first a wordpress theme designed by Jinsona of web2feel.com for Wordpress.org users. I converted it into our friendly Blogger format!


Read More


Terima Kasih Telah Berkunjung di Blog Ini Update terus untuk mendapatkan Artikel terbaru

X